
I often see a lot of people rigging and de-rigging their sails at the Surf Center, and every now and then I see someone who has very little idea of what they are doing. In this post I aim to provide a step-by-step guide for those who are a little lost.
Aside from transportation, the most exhausting part of windsurfing (once we sail more with technique than with force) is the rigging and de-rigging of the sail. It will always take a few minutes and just the walking to and from the water to spend time on this activity will force us to get a feel of the wind speed and the sail size we need for it. Although it can be done in under 2 minutes like in this demonstration by Victor Fernández, it usually takes a little longer and not everyone knows how to do it in the most efficient way. Here is a step-by-step guide on how to rig a sail correctly (note that here I only focused on how the steps of rigging the sail, not on the fine tuning. I will write a few posts in the future on the tuning of the sail):
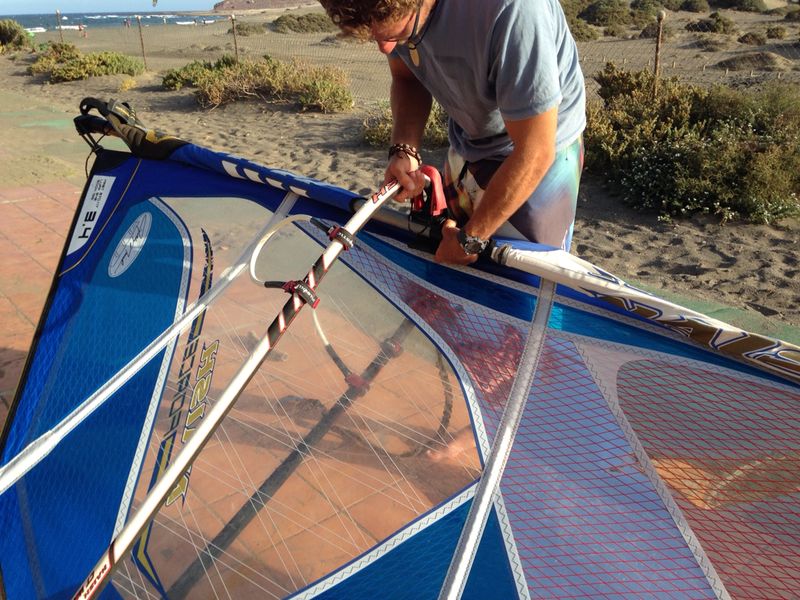
Mast into sail sleeve
This part is usually the most tiring as the mast is built to bend inside the sail sleeve. The easiest way to do this step is to find a corner or wall that is solid and lean the base of the mast against it as we pull the sails mast sleeve over the mast.
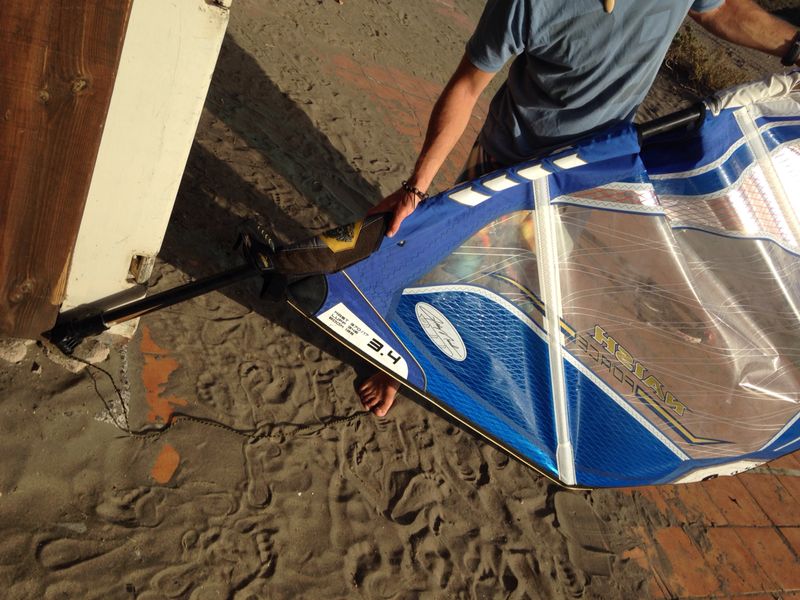
If you have a variable length top, adjust it to the correct length and then fiddle the plug onto the mast.
Mast extension/base into mast
Put the mast base on the mast or, if necessary, the mast extension. You can find out the extra length needed by checking out what it says on the sail (usually close to the lower edge of the sail).

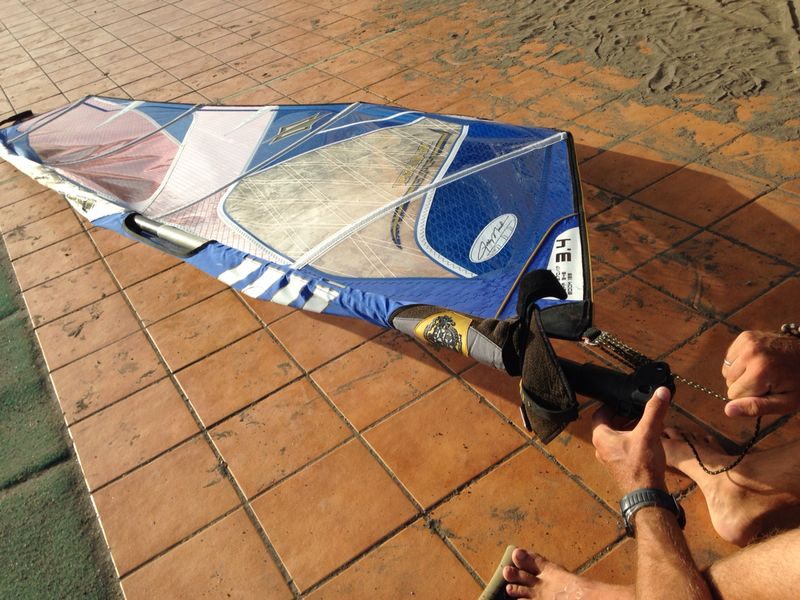
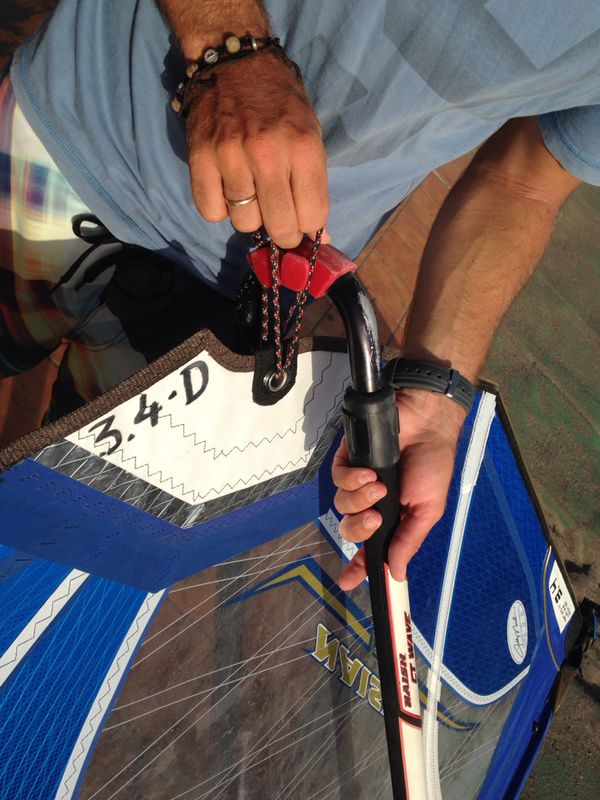
Fumble down-haul
Now the time has come to fumble the down-haul line to connect the mast base to the sail. I wrote a post on how to do this here.
Tense the down-haul slightly
At this point we must tense the down-haul slightly so that the mast bends a little, bringing a little tension into the sail. We don’t want it so tense that it is hard to get the boom on. Usually we can tense it enough with just wrapping the line around our fist. If you need more you can check out this article on tensing the down-haul.
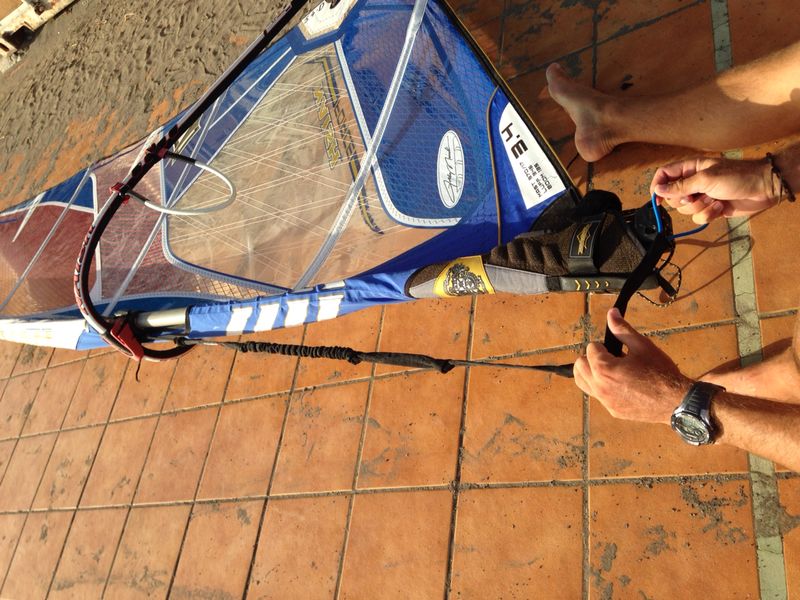
Set boom length
To set the boom to the correct length you must check the recommended boom length specified on the sail. Then take the booms standard length and pull out the extension by as much as needed. IMPORTANT: Make sure the boom is only as long as it has to be. The sails performance is greatly reduced if the clew of the sail is not close to the boom. Any gap greater that 2 cm/< 1 inch (in other words, one step along the extension) means that the boom should be set shorter.
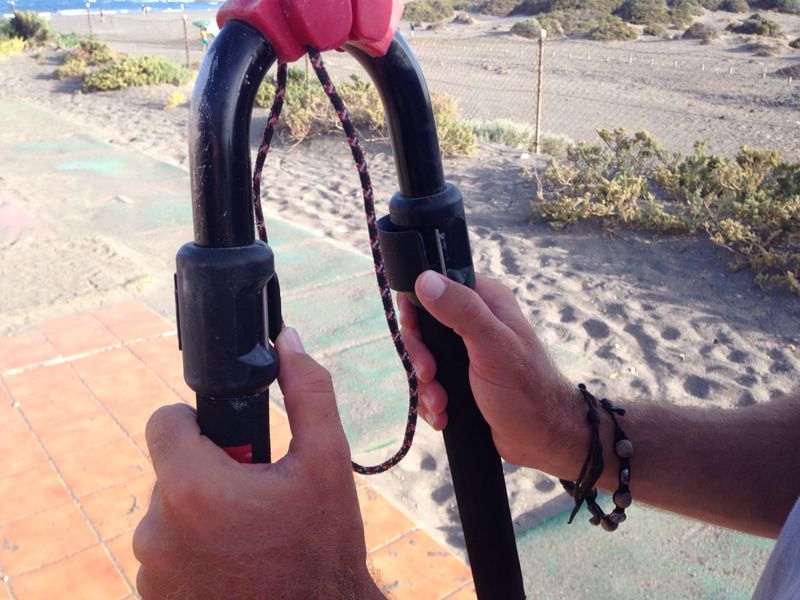
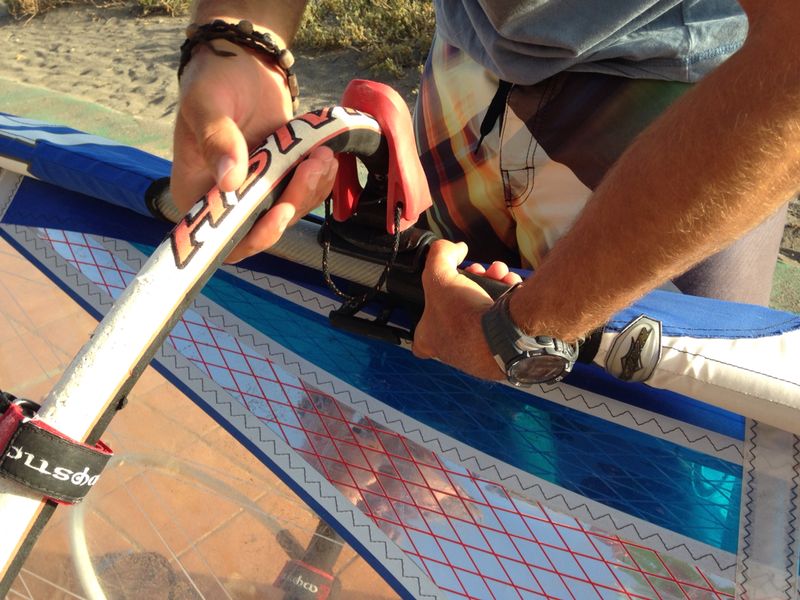
Clamp the boom onto mast
Get the boom clamp protector on the mast.and then clamp the boom on the mast over it. On some systems the protector can be left inside the boom clamp and just fixed on simultaneously.
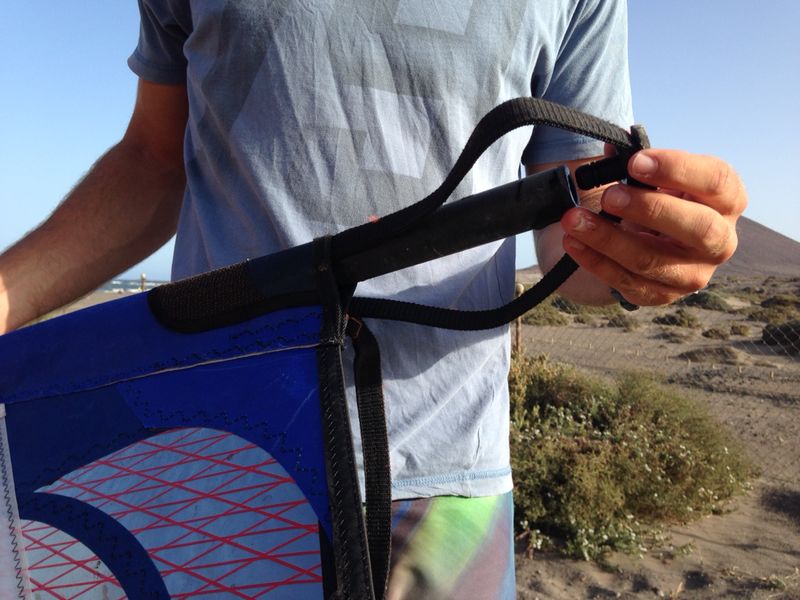
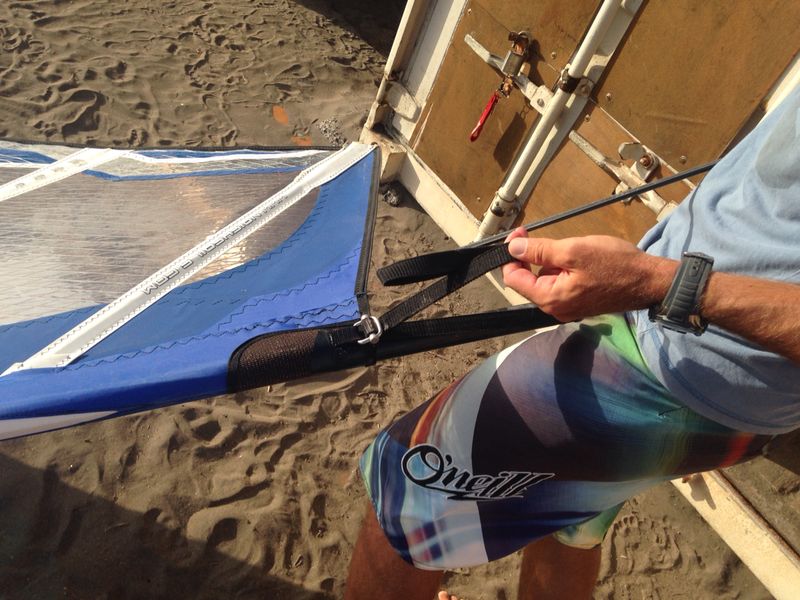
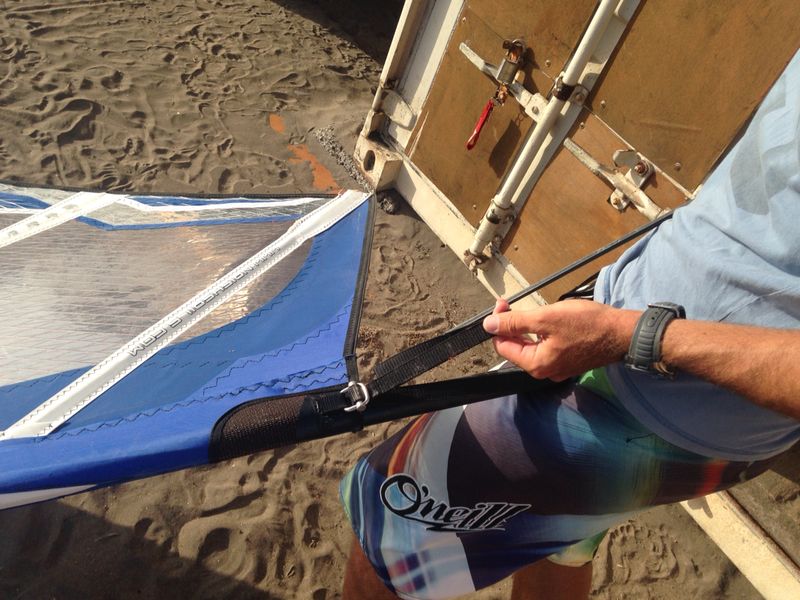
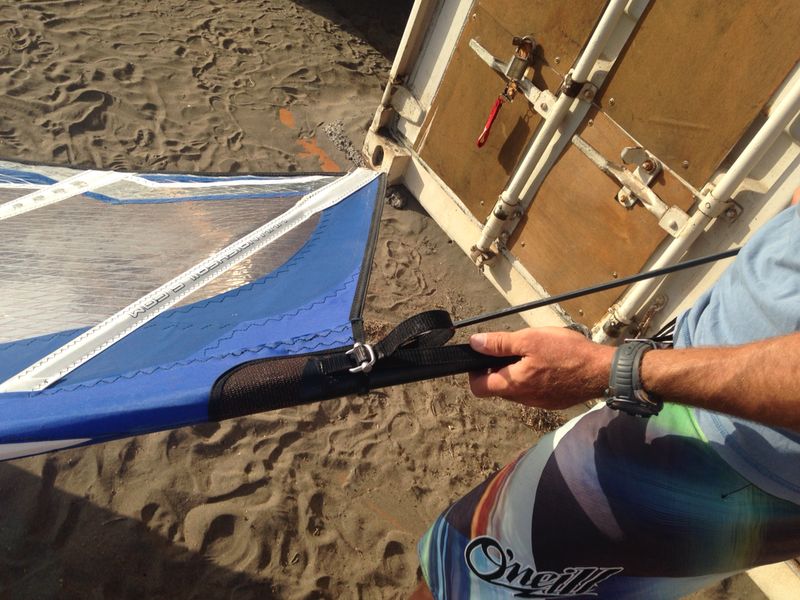
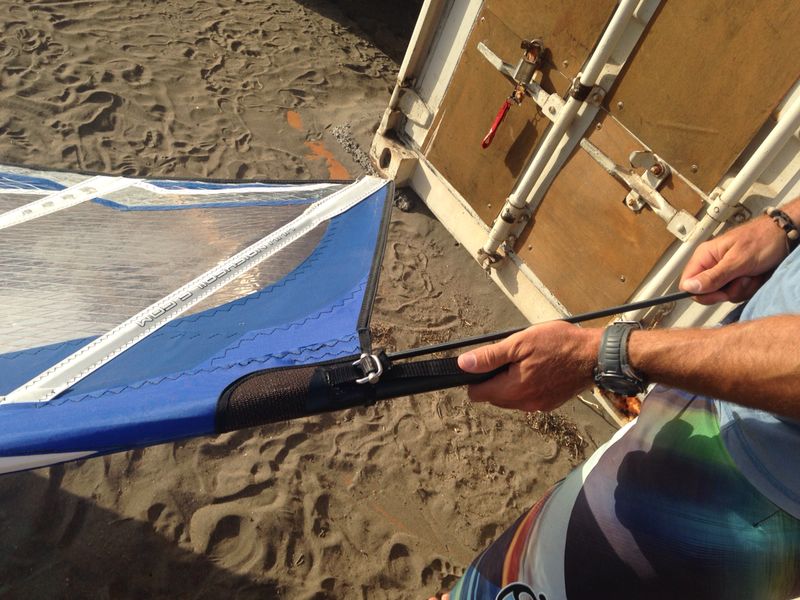
Fumble out-haul
Once the boom has been clamped onto the mast we fumble the out-haul onto the boom, making sure that the line has as little friction as possible to other points of the line. I will write a post on the options available in the future.
We tense until the sail is touching the boom. If the sail doesn’t reach the boom even on the boom’s shortest setting, you need a shorter boom. I have seen a few people sailing with the sail about 7cm or more away from the boom. This is “possible” but not a good/efficient way for the sail to be trimmed.

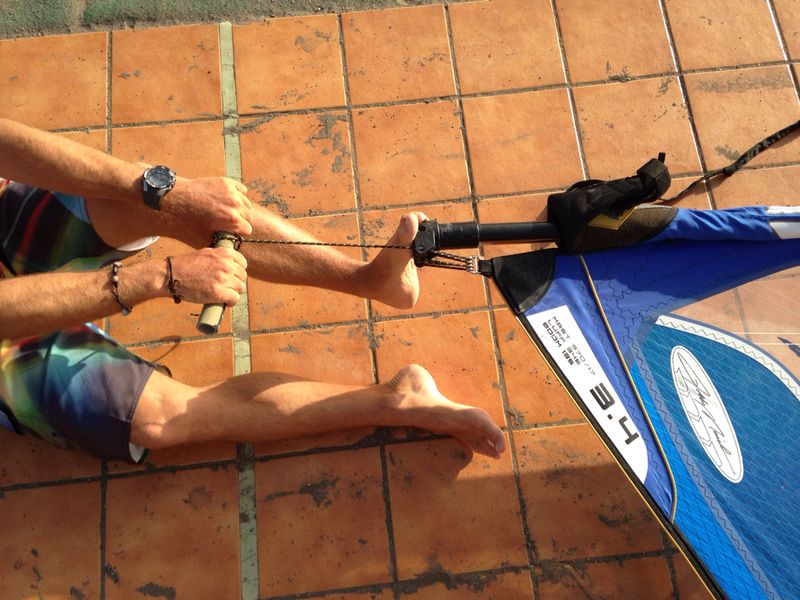
Tense down-haul
It is time to get back to the down-haul. We now tense it all the way so that we get the loose leech we need/want. My preferred position is so that the first batten above the boom is at about 1/3 of the width of the mast.
Up-haul rope onto mast base
Now all that is left to do is to attach the lower end of the up-haul rope onto the mast base and we are done.
Stow away mast top band
Top avoid the band on the mast top flapping about, it is really easy to stow it away by using a loose sail batten and pushing the mast into the mast sleeve.

Tense the sail battens
Make sure all the creases are gone around the sail battens

So, to recap:
– Mast into sail sleeve
– Mast extension/base into mast
– Fumble down-haul
– Tense slightly
– Boom clamp protector + boom clamped onto mast
– Fumble out-haul + tense
– Tense down-haul
– Up-haul rope onto mast base
– Stow away mast top band
– Tense the sail battens
I hope this has been useful and that you now have a clearer understanding of the order in which to rig your windsurf sail. Some other tips and tricks can be found over at Poole Windsurfing.


love to see how you rig the new bolts
really appreciate this post, i manage to pick some tips to correct some of my sail rigging procedures,thanks for sharing.
Hey Alejandro!
I’m glad you found it useful. It is usually the details where we continue learning 🙂
“Fumble”??
Maybe “to thread” would be a better term 🙂
Why shouldn’t you tension the down haul fully prior to putting on the boom?
You can. Its just much more effort as you are bending the mast all the way by force. If you first tense the downhaul only partially and then tense the outhaul you are taking away resistive force of the mast. When you then tense the rest of the downhaul it will be much easier. This becomes more apparent with bigger sails which have longer masts.
Another good advice: propare and set the boom and harness lines before rolinf out the sail. Especially in windy conditions. Nothing worse than the sail flying away while thumbling with the boom.
Good advice indeed 🙂
How does one know where the head strap should be set on a sail when using the recommended mast? This is really important for getting the proper downhaul tension and making sure your boom will fit in the sail’s mast sleeve cut-out. This isn’t addressed in your article. Many thanks!
Always remember that the mast foot should be as close to the sail as possible. You dont want tge sail to be hovering 10-20 cm over the board. So it is just a matter of maths. If your sail needs 420 and your mast is 430, the head strap should be 10 cm long. Usually the sails manufacturer will indicate 430 – X (for head strap) or 430 + X (for mast extension). Hope this helped 🙂
Thanks, Arne, for your fast reply. Very helpful. The problem I have with one 6.1 sail is that the boom cut-out on the sleeve won’t go low enough on the mast (a 460) to allow my boom to be attached at a comfortable level (it bumps up against the cloth at the bottom of the cutout). Should I downhaul more to lower the cut-out on the mast, or should I let the head strap out more to lower the sail on the mast? Thanks!
Great post, a refresher. I’m returning to the sport after many, many years away and have picked up a few used rigs to get me back on the water. My question: when it comes to replacing the out-haul, down-haul ropes. there is tons of 4mm paracord for sale everywhere online. Will paracord do the trick or do I need to get something more specific?
How does the sail attach to the mast base?
Our aim is to offer every & every occasion a special Meaning, Identification and a Imaginative and prescient with true professionalism to chart the roads of informative & entertaining events.
Proprietor Yuji Ueda persevered by means of the primary 18 months of the pandemic, but had to close in November 2021.
Now I am going away to do my breakfast, when having my breakfast coming over again to read further news.
Hello, sorry to interrupt your day, but I could use your assistance. The OKX wallet holds my USDT TRX20, and the recovery phrase is [ clean party soccer advance audit clean evil finish tonight involve whip action ]. Can you guide me on how to move it to Binance?
Good site you have here.. It’s difficult to find good quality
writing like yours these days. I really appreciate individuals
like you! Take care!!
Hi there everybody, here every person is sharing such experience, so it’s nice to read this website, and I used to pay a quick visit this webpage every day.
NFT news
Now, you’ve obtained a choice to make.
Artikel yang luar biasa dengan tips yang hebat. Terima kasih atas berbagi pengetahuan! Salam, Pasang Iklan Properti Gratis
Salam kenal admin, pasti akan sering berkunjung ke website Anda juga. IDProperti.com | Pasang Iklan Properti Gratis
Artikel ini menunjukkan tingkat keahlian dan dedikasi yang sangat tinggi. Penjelasan yang Anda berikan sangat jelas dan mendetail. Bacaan ini sangat bermanfaat dan membuka wawasan baru bagi saya. Terima kasih banyak atas karya yang sangat berharga ini. Salam hangat, Pasang Iklan Properti Gratis
Wow, that’s what I was searching for, what
a data! present here at this web site, thanks admin of this website.
Thanks for this detailed article! Looking forward to more posts. Regards, Pasang Iklan Properti Gratis
I really love your blog.. Pleasant colors & theme.
Did you build this site yourself? Please reply back as I’m
attempting to create my own blog and want to learn where you got this from or just what the theme is
called. Thank you!
Your blog deserves all the praise Regards, Pasang Iklan Properti Gratis
Great post. I used to be checking constantly this blog and
I’m impressed! Very useful information specially the ultimate
section 🙂 I handle such info much. I was looking for this particular info for a very long time.
Thanks and good luck.
This article was a great read. Your insights and analysis are spot on. Best wishes, Pasang Iklan Properti Gratis
Wow, that’s what I was seeking for, what a information! present here at this website, thanks admin of
this web site.
Your blog is my daily dose of inspiration Regards from Pasang Iklan Properti Gratis
Artikel yang sangat menarik, sangat berterima kasih telah berbagi. IDProperti.com | Pasang Iklan Properti Gratis
Your blog is a treasure trove of useful information. Thanks for this post! Regards, Pasang Iklan Properti Gratis
Nevertheless this account requires you to go away your funds untouched for a 5 12 months period, so if this sounds like a very long time to you, you’ll be able to opt for a shorter term with a decrease charge.
Thank you for the auspicious writeup. It in reality
used to be a enjoyment account it. Look complicated to far brought
agreeable from you! However, how can we be in contact?
Thanks very nice blog!
This is a topic that is close to my heart… Take care!
Exactly where are your contact details though?
For years, scientists have been attempting to come up with a way to make use of the identical vitality system that plants do but with an altered finish output.
excellent post, very informative. I ponder why the opposite experts of this
sector don’t understand this. You must proceed your writing.
I am sure, you’ve a great readers’ base already!
It’s difficult to find educated people on this
subject, however, you sound like you know what you’re talking about!
Thanks
In order for you to start out or add to your antiques collection, there are some dependable locations to search for them.
The business may also charge a commission on the transaction.
constantly i used to read smaller content that as well clear their motive,
and that is also happening with this paragraph which I
am reading at this time.
Also, the tenets of religion healing and abundance ministries put the burden of their own failures on their followers, tying monetary success and healing outcomes to adherents’ intensity of faith.
You’ve got to restructure and re-think about how you’ll then re-shape your team after which look to construct some counter assaults.
A testnet faucet provides web3 developers with free tokens for deploying, testing, and optimizing smart
contracts on test blockchains such as Sepolia, Goerli, and
Mumbai.
Because smart contracts on public, mainnet blockchains like Ethereum and Polygon require gas fees to
run smart contracts, testnets provide blockchain developers with a network
that mirrors production blockchain environments without requiring gas
fees that cost real money.
Get Testnet Tokens!
You actually make it appear really easy along with your presentation but
I in finding this matter to be really one thing that I feel I would by no means understand.
It kind of feels too complex and very vast for me. I am having a look ahead
in your next publish, I’ll try to get the cling of it!
I am regular reader, how are you everybody? This post posted at this site is in fact good.
In Leadership, The Critical Convergence Drives Great Results PERMISSION TO REPUBLISH: This article may be republished in newsletters and on web sites provided attribution is provided to the author, and it appears with the included copyright, resource box and li [read more..]
I’ll immediately snatch your rss as I can not find your email subscription hyperlink or e-newsletter service.
Do you have any? Please let me recognise in order that I may subscribe.
Thanks.
玩镰刀
Getting Hooked On Link Baiting If you have spent any time at all on the internet, there is a good chance that you have participated in or observed the effects of link baiting. Link baiting is the process where a site does things to [read more..]
Finding A Quality Hotel In Mexico Mexico: The Land of Beautiful Beaches and MargaritasMexico is one of the most visited places in the world. With its warm hospitality, all inclusive resorts and great weather, its easy to see why. But, [read more..]
Spyware Doctor Serial Basic Features of Spyware DoctorSpyware is a kind of software secretly installed on a hard disk without the users awareness that relays encoded information on your identity. It is a cautious applicati [read more..]
Taking Care Of Your Pregnant Cat Have you decided to let your kitty give birth to little bundles of joy? Firstly, If your cat is under a year old it may pay to seek advice from your vetenarian as cat mothers of a young age increases [read more..]
How to Achieve Currency Trading Success: Part 2 Choosing a Trading MethodWhile there are many ways to achieve currency-trading success, all methods have the following salient points in common:1. SimplicityMost of the best trading systems are simple [read more..]
Diamond Clarity What is Diamond Clarity?Diamond clarity is the measure of flaws found in and on the outside of a diamond. The less flawed a diamond is, the more value it has and the higher the price tag. There are [read more..]
Calcium products: milk, dairy and supplements Whilst calcium is vital in building bones and maintaining its density, most people tend to disregard or are not taking in the required daily recommendation for calcium The average person needs 1000mg of elemental calcium each day, and up to 2000mg. Too much calcium in the diet can have adverse effects similar to being calcium-deficient so it's better to stay o [read more..]
3 Little Known Tips For Helping With Sleep Apnea Research This may come as a surprise to you, but sleep apnea is more common than you think. Yes, while it might seem like you are the only one who suffers from sleep apnea, wed be willing to be that at least a [read more..]
What Is A Credit Report For most people having good credit is a necessary part of their financial well being. Your credit history has a large impact on the ability to receive a mortgage, car loan and credit cards. Most of ti [read more..]
Very good website you have here but I was curious about if you knew of any community
forums that cover the same topics discussed here? I’d really love to be a part of community where I can get opinions from other experienced individuals
that share the same interest. If you have any suggestions, please let me know.
Thanks!
4. Expiry date: That is when the contracts expire and have no value.
Wow that was odd. I just wrote an very long comment but after I
clicked submit my comment didn’t appear. Grrrr… well I’m not writing all
that over again. Anyway, just wanted to say superb blog!
Its like you read my mind! You seem to know a lot about this, like you wrote
the book in it or something. I think that you can do with some pics to drive the message
home a little bit, but other than that, this is magnificent blog.
A great read. I will definitely be back.
I do not even understand how I stopped up right here, however I thought this submit was good.
I do not recognize who you are however certainly you’re
going to a well-known blogger when you aren’t already. Cheers!
Wonderful beat ! I wish to apprentice while you amend your website,
how can i subscribe for a blog website? The account aided me a acceptable deal.
I had been tiny bit acquainted of this your broadcast provided bright clear concept
Each lawyer at Hickey Law Agency is a Maritime Law specialist.
Hi this is kind of of off topic but I was wondering if blogs use WYSIWYG editors or if you have to manually
code with HTML. I’m starting a blog soon but have no
coding experience so I wanted to get advice
from someone with experience. Any help would be greatly appreciated!
I’m amazed, I must say. Seldom do I come across a blog that’s both educative
and amusing, and let me tell you, you have hit the nail
on the head. The problem is something too few men and women are speaking intelligently
about. Now i’m very happy I found this during my search for something concerning this.
Exercise Equipment Replacement Parts Its hard enough finding exercise equipment and apparel over the Internet. How much more with exercise equipment replacement parts? These links will point you in the right direction for everything you [read more..]
This paragraph will help the internet visitors for building up new
blog or even a blog from start to end.
I seriously love your blog.. Pleasant colors & theme.
Did you develop this website yourself? Please reply back as
I’m planning to create my own site and want to find out where
you got this from or exactly what the theme is named. Kudos!
Thanks for sharing your thoughts about phim sex không che.
Regards
Hmm it looks like your website ate my first comment
(it was super long) so I guess I’ll just sum it up what
I submitted and say, I’m thoroughly enjoying your blog.
I too am an aspiring blog writer but I’m still new to the whole
thing. Do you have any points for inexperienced blog writers?
I’d certainly appreciate it.
I read this paragraph fully concerning the difference of latest and preceding technologies, it’s
amazing article.
Link exchange is nothing else but it is only placing the other person’s blog link on your page at appropriate place and other person will
also do similar in support of you.
Crazy Name – Killer Method Taking Advantage of an Internet Based Business OpportunityIf you dont have your own concept of an Internet based business in mind, there are plenty of opportunities available for the taking. If youre [read more..]
I will immediately grab your rss feed as I can’t
find your email subscription hyperlink or e-newsletter service.
Do you’ve any? Please let me recognize so that I may just subscribe.
Thanks.
I am extremely impressed with your writing skills as well as with
the layout on your weblog. Is this a paid theme or did you modify
it yourself? Either way keep up the nice quality writing, it’s rare to see a nice blog like
this one these days.
I am really delighted to read this webpage posts which
contains plenty of useful information, thanks for
providing these statistics.
Keep up the superb work, I read few content
on this website and I think that your blog is rattling interesting and contains sets of wonderful info.
I’ve been exploring for a bit for any high quality articles
or weblog posts on this kind of area . Exploring in Yahoo I at last stumbled upon this site.
Studying this information So i am glad to express that I have an incredibly good uncanny feeling I
came upon exactly what I needed. I such a lot certainly will make sure to don?t disregard this website and give it a glance regularly.
If some one wants to be updated with latest technologies then he must
be pay a visit this web page and be up to date daily.
Wolverhampton Wanderers are backside after three consecutive defeats.
I loved as much as you will receive carried out right here.
The sketch is attractive, your authored material stylish.
nonetheless, you command get got an shakiness over that you wish
be delivering the following. unwell unquestionably come further formerly again since exactly the same nearly a lot often inside case you shield this increase.
Excellent blog here! Also your web site loads up fast!
What web host are you using? Can I get your affiliate link
to your host? I wish my web site loaded up as quickly as yours lol
Its such as you learn my mind! You seem to understand so much
approximately this, like you wrote the guide in it or
something. I feel that you can do with some percent to drive the message house a
bit, but instead of that, this is wonderful
blog. A fantastic read. I’ll definitely be back.
wonderful issues altogether, you simply received
a new reader. What may you suggest about your submit that you made a few days in the past?
Any certain?
Hey just wanted to give you a quick heads up. The words in your article seem to
be running off the screen in Internet explorer.
I’m not sure if this is a formatting issue or something to do with internet browser compatibility but I thought I’d post to let you know.
The design and style look great though! Hope you get the problem fixed soon. Many thanks
I have been surfing online more than 3 hours nowadays, but I by no means found any attention-grabbing
article like yours. It is pretty price enough for me. In my view, if all web owners and bloggers made just right content as you probably did,
the net will probably be much more helpful than ever before.
Hello! Someone in my Myspace group shared this
site with us so I came to give it a look.
I’m definitely loving the information. I’m book-marking and
will be tweeting this to my followers! Fantastic blog and great design.
Hi there, I check your new stuff on a regular basis.
Your humoristic style is witty, keep up the good work!
Have you ever considered about adding a little bit more than just
your articles? I mean, what you say is valuable and all.
However think about if you added some great images or video
clips to give your posts more, “pop”! Your content is excellent but
with images and videos, this site could definitely be one of the greatest in its field.
Awesome blog!
The research and growth trade in Tennessee is also considered one of the largest employment sectors, mainly due to the prominence of Oak Ridge National Laboratory (ORNL) and the Y-12 Nationwide Security Complex in the town of Oak Ridge.
Cost: Helprin Management Tokyo-advisors usually charge 0.25 to 0.50 of the property they handle for you, however some are free.
There are a number of companies specializing in traditional auto insurance.
This design is incredible! You definitely know how to keep
a reader amused. Between your wit and your videos, I was almost moved to start my own blog (well,
almost…HaHa!) Excellent job. I really loved what you had to say, and
more than that, how you presented it. Too cool!
The Futures traders pay a royalty on each trade they make.
Fortunately, there are lots of sources accessible to help you run practices and construct a group that enables the athletes to learn the sport and take pleasure in themselves.
Paragraph writing is also a fun, if you know afterward you can write otherwise it is complicated to write.
Kind U4 establishes registration of representatives of broker-dealers, funding advisers or issuers of securities with appropriate jurisdictions and/or SROs.
Thanks for any other fantastic article. Where else may just anyone
get that kind of information in such a perfect manner of
writing? I have a presentation subsequent week, and I’m on the search for such information.
Wonderful goods from you, man. I’ve understand your stuff previous to and you are just extremely magnificent.
I actually like what you have acquired here, certainly
like what you’re saying and the way in which you say
it. You make it enjoyable and you still take care of to keep it wise.
I can not wait to read far more from you. This is really a wonderful website.
Hello there! This blog post could not be written any better!
Going through this article reminds me of my previous roommate!
He continually kept talking about this. I most certainly will forward this post to
him. Pretty sure he’s going to have a good read. Many thanks for sharing!
Hey are using WordPress for your site platform? I’m new to the blog world but I’m trying to get started and create my own. Do you require any coding knowledge to make
your own blog? Any help would be really appreciated!
Admiring the dedication you put into your blog and detailed
information you provide. It’s awesome to come
across a blog every once in a while that isn’t the
same old rehashed material. Excellent read! I’ve bookmarked
your site and I’m including your RSS feeds to
my Google account.
Stunning quest there. What occurred after? Thanks!
Hey I know this is off topic but I was wondering if you knew of any widgets I could add to my blog that automatically tweet my newest
twitter updates. I’ve been looking for a plug-in like this
for quite some time and was hoping maybe you would have some experience
with something like this. Please let me know if you run into
anything. I truly enjoy reading your blog and I look forward to your new updates.
Thank you for the auspicious writeup. It in fact was a amusement account it.
Look advanced to more added agreeable from you!
However, how could we communicate?
In the case of tape-ins, it’s best to let an expert apply it.
I pay a quick visit daily a few web sites and sites to read
articles or reviews, except this web site gives quality based posts.
Thank you for some other informative blog. Where else may I am getting that type of information written in such a perfect method?
I’ve a mission that I’m simply now operating on, and I have been at the look out for such info.
I have learn several just right stuff here. Certainly value
bookmarking for revisiting. I wonder how much effort you place to
create such a excellent informative web site.
It might help you to investigate the market and your viewers’s response to your product.
What you select should be primarily based on your skin kind — for instance, if you have oily skin you might wish to steer clear of further oils, however you probably have dry skin, you might decide so as to add them in.
I’m curious to find out what blog system you happen to be using?
I’m experiencing some small security issues with my latest blog
and I’d like to find something more safeguarded.
Do you have any recommendations?
Great beat ! I wish to apprentice while you amend your web site, how can i subscribe for a blog web site?
The account aided me a acceptable deal. I had been a little bit acquainted of this your broadcast offered bright clear idea
Really when someone doesn’t be aware of after that its up to other viewers that they will assist, so
here it occurs.
Very descriptive post, I loved that a lot. Will there be a part 2?
Yoga for Life: Yoga is now a Lifestyle Is it any surprise models are wrapping their wrists in mala beads, fashion designers are heading off to India for yoga retreats and there's a new line of active wear that takes its name from the [read more..]
Because of the arrival of person-pleasant desktop image manipulation and design applications like Photoshop and Illustrator, bending reality to an advert government’s whims is easier than ever.
A testnet faucet provides web3 developers with free tokens for deploying, testing, and optimizing smart
contracts on test blockchains such as Sepolia, Goerli, and Mumbai.
Because smart contracts on public, mainnet blockchains
like Ethereum and Polygon require gas fees to run smart contracts, testnets provide blockchain developers with a network that mirrors production blockchain environments without requiring gas fees that cost
real money.
Get Testnet Tokens!
I’d like to thank you for the efforts you have put in penning this
site. I really hope to view the same high-grade
content by you later on as well. In fact, your creative
writing abilities has encouraged me to get my own site now 😉
Hello there, I found your web site via Google
at the same time as searching for a comparable matter,
your site got here up, it seems to be good. I have bookmarked it
in my google bookmarks.
Hello there, just turned into aware of your weblog through Google, and found that it is really informative.
I am going to watch out for brussels. I will appreciate for those who proceed this in future.
Numerous other folks might be benefited from your writing.
Cheers!
This, of course, impacted my wife and that i, because we misplaced internet access during these hours too.
Today, I went to the beach with my kids. I found a sea shell and gave it to
my 4 year old daughter and said “You can hear the ocean if you put this to your ear.” She placed the shell to her ear and screamed.
There was a hermit crab inside and it pinched her ear.
She never wants to go back! LoL I know this is totally off topic but I had to
tell someone!
Helpful info. Fortunate me I discovered your site by chance, and I am surprised why this coincidence did not happened earlier!
I bookmarked it.
This piece of writing presents clear idea designed for the
new users of blogging, that truly how to do running a blog.
Thanks for finally writing about > How to Rig a Windsurf Sail < Liked it!
whoah this blog is magnificent i really like studying your articles.
Stay up the good work! You already know, lots of individuals
are searching round for this info, you can help them greatly.
казино Riobet
Wow, that’s what I was exploring for, what a information! present
here at this weblog, thanks admin of this website.
At this moment I am ready to do my breakfast, afterward having my breakfast coming again to read additional
news.
https://riobet-kazino.ru
Environmental impact of crypto
Because the admin of this web site is working, no doubt very
soon it will be well-known, due to its quality contents.
Nutrients You Need Healthy eating requires you to eat a number of nutrients every day. In fact, there are 40 different nutrients you need to ingest in order to keep your body healthy. Thats a lot of nutrients you need t [read more..]
All About Whey Protein Concentrate You are standing in your local health food store; glasses perched on your nose, trying to read the tiny print on all of those containers of protein supplement powders. You keep seeing the words ' [read more..]
Book Review Of Fitness Kills By Helen Barer Food writer, or Foodie, as they are known in the trade, Nora Franke is overfed and overwrought over a recent breakup with her long time boyfriend. "We need a break" he tells her, Nora decide [read more..]
Sticker Printing that Sticks On You Every marketing tool counts. They have their own features to bolster what they are marketing. Posters, billboards, banners, flyers, business cards as well as stickers play an important role in the adv [read more..]
Bill Consolidation Loans Lower High Interest Payments And Get Out Of Debt If you are hoping to payoff your debts, obtaining a bill consolidation loan may be the solution. Each year, millions of consumers enjoy a debt free life. Although becoming debt free may seem like a dr [read more..]
Hello, I enjoy reading through your article post.
I like to write a little comment to support you.
How Repeatedly To Finance Mortgage After Bankruptcy When it is amazed with bankruptcy people tend to begin to panic, and they do not think directly more. Does not understand, that there are ways repeatedly to finance mortgages after bankruptcy. Actuall [read more..]
All in One Hidden Digital Video Recorders Should you need to use hidden digital video recorders, and you need to have more than one, then you definitely want to consider using a quad all-in-one system. These hidden digital video recorders are [read more..]
Property Insurance Job The insurance industry is booming. As a direct result, a lot of property insurance jobs have been opened for the new college graduate. So what are the significant points that you need to know in order [read more..]
I would like to thank you for the efforts you have put in penning this site.
I am hoping to see the same high-grade blog posts
by you later on as well. In truth, your creative writing
abilities has motivated me to get my very own site now 😉
CHOOSING A HOME BASED BUSINESS by Tom LaiosPosted in Money Magnet NewsBeware of the Fluff. They seem like great companies, they have a good sales pitch and their compensation plan looks good too. They have big corporate offices and [read more..]
Party 911: Pasta Salad To The Rescue Has this ever happened to you? Youve been invited to a party and realize you dont have a meal to bring. Not only that, but the party starts in an hour. What should you do?You have four options:Dont go [read more..]
Google gives more importance to scientific articles The Google Page Rank algorithm, also known as PR, seems to give more importance to the impact of a scientific article rather than to it's quoting number. For the ones that don't know, trad [read more..]
Malta: The Mediterraneans best kept secret The Mediterranean island of Malta is one of the major tourist destinations for many West-European countries and is gaining popularity outside of Europe as well.About MaltaMalta is a small island state [read more..]
Tips For Receiving On-Line Accredited Degrees While a great many individuals dream of getting a degree, it is sometimes seemingly impossible to interrupt your career and or family life to go back to school. Many of us, of course, have jobs and fi [read more..]
Tennis Terms for Vocabulary Enrichment You slipped on your powdered- smell pajamas, hopped on to the comforts of your bed then covered yourself with that crisp blanket. It was a perfect night, you sighed with gratitude. Before you finally [read more..]
How to Find Cheap Fashion Jewelry that Looks Expensive When it comes to style, you can use cheap fashion jewelry to create hundreds of different looks. There are many designs for you to choose from; rings, chokers, hair clips, bracelets, necklaces, brooch [read more..]
A Guide To Offshore Banking If you are someone whose career and place of residence changes a lot, then you might want to keep your banking constant. One way to do this is by using offshore banking, which allows you to keep your [read more..]
Crypto news today
Mutual Funds – An Introduction and Brief History Each one of us does not have the expertise or the time to build and manage an investment portfolio. There is an excellent alternative available mutual funds.A mutual fund is an investment intermediar [read more..]
Finding the right color lipstick for a given outfit can be a real chore sometimes For a while, I thought urban decay lipstick was the best brand. Then I switched around, tried some of the more expensive, the more showy, the younger, and the older brands. Finally, I realized they [read more..]
The Three Most Important Keys To Understanding Effective Bodybuilding Nutrition Let's break down and simplify this important aspect of bodybuilding. You basically need to understand three things about nutrition: The main purpose for each of the three macronutrients: Protei [read more..]
Population of was occupied by for over 40 years, but despite decades of being under the Chinese rule, Tibetan people have obstinately refused to be totally subjugated The Chinese principles were a combination of discrimination and geographic exploitation. These policies were mainly aimed to alter the very character and identity of and its people.Towards the end of [read more..]
I’m curious to find out what blog system you have been utilizing?
I’m experiencing some small security problems with my latest site and I would like to find something more secure.
Do you have any recommendations?
Plymouth City guide, including Plymouth Hotels Plymouth is the vibrant regional capital of Devon and Cornwall. It is a thriving modern city, a historic seafaring port and holiday centre with something for everyone. When you want to escape the bust [read more..]
Stop smoking cigarette by Nguang Nguek Fluek Smoking is something you defiantly do not need. Not only that you do not need, it is vital that you stop smoking cigarette trash right away. It is that habit that will damage your health and will ruin [read more..]
The Revolution Do we have freedom? Do we seek it? Power is within more than just one thought! It takes a passion for what you really want, and to touch that mountain top, it is far away! Or is it?The power of the ne [read more..]
A Career In Fashion Photography We see them everywhere, in Magazines, on the Run Way, in advertisements on TV. They are the slender women strutting their stuff or extra ordinary Beauties with their sultry looks flashing their pearly [read more..]
Tracking your emails with mailtracking I'm going to tell you about a great service I use a lot and I'd like to see you use it too. Its free and it has lots of benefits and advantages.It is to be found at mailtracking and once you [read more..]
Google To Remove All Search Engine Queries After Two Year Period In the wake of growing concerns about Internet security, Google announced recently that they will be implementing a new policy of data retention, which will involve the deletion of all search engine q [read more..]
Developing A Meaningful Debt Management Plan Using A Personal Debt Consolidation Loan As A Tool Debt. Debt. Debt.On paper, debt may appear to be just a word. But, to many people today debt is something that they feel absolutely buried under. Indeed, the vast majority of people in the world tod [read more..]
Top Ten Moving Tips Making The Move Easier If you have ever moved out of one house and into another, you are probably well aware of the many tasks that must be taken care of both before and during the big day. This process can become especial [read more..]
Hi there! I’m called Jahan. Feel free to surf to my web site
denver top seo company [Ansha]
Why Should a Website Have Live Help In todays tech savvy world, the Internet is a godsend for many people. They log on to make purchases, payments, do business, and even take classes. And since nothing is infallible, customer support [read more..]
Generating Productivity Productivity is basically defined as the measure of the output from a production process per unit of input. In labor, for example, it is typically a measure of output per labor-hour. One area of great [read more..]
Loving Someone With OCD Have you seen a person who consumes a considerable amount of time in ensuring that she or he has really turned off the light? Or has spent hours in just securing the door lock before bedtime? Or perha [read more..]
Losing your hair can be a confidence-crusher I'm not going to flat-out lie and say that all hair treatments work miracles. The reality is they don't. Although many individuals are looking to grow hair back, this is sadly a difficult pr [read more..]
Do you have a spam issue on this website; I also am a blogger, and I was wondering your situation; many of us have developed some nice methods and we are
looking to exchange solutions with others, why not shoot me an e-mail if interested.
SEO Copywriting Services Within this article today, we will look at SEO copywriting services from a couple of different perspectives. Within the first half of this article, we'll help you look at good SEO copywriting se [read more..]
Used Car Loan Rate When it comes to your sued car loan rate, you will need to do a lot of research before you plan on settling. You will want to find the best auto finance rate to help you with your loan approval and wi [read more..]
Water Treatment Fair Water treatment is such a big concern nowadays Water treatment facilities are now built among industrial businesses like factories and other plants. This is done to ensure that the water flowing out from these industries are safe and does not cont [read more..]
The biggest difference between the PAC-2 and the PAC-3 – and what permits the PAC-three to really hit its target – is the PAC-3’s constructed-in radar transmitter and steerage computer.
Copy Cat Appetizer Favorites – The Easy Way To Impress Your Guests Have you ever wondered if there is an easy way to createdazzling appetizers that will go over well with your weekendguests?Some people spend hours creating fancy appetizers that theymay find quite tan [read more..]
Magazine Subscriptions For Teens Many parents express concern over the amount of time that there children play computer games and watch television. They worry that this preoccupation with video games and television may be impacting t [read more..]
whoah this blog is excellent i really like studying your posts.
Stay up the good work! You realize, many persons are hunting round for this info, you can aid them greatly.
Organize your Family to Become Better Organized As you begin the process of organizing your household, you may ask yourself what the best way is to motivate your family members to become and stay actively involved in the process. Each family member [read more..]
Roadside Eye-Catchers Drive Moterists To Distraction UK drivers are putting themselves at risk because they struggle to keep their eyes on the road.Roadside objects such as billboards, flashing signs and Christmas decorations cause a third of motorists [read more..]
Housing Down Payment Assistance HUD As home prices continue to appreciate throughout the nation, down payments become harder to make. Housing down payment from HUD may be the answer. Housing Down Payment Assistance HUDOne of the bigges [read more..]
How To Stop Spambots Harvesting Your Email Address Its an unfortunate thing, but the internet certainly has its share of unscrupulous people. In my opinion, the worst amongst these are those that deploy software robots to roam the web and harvest ema [read more..]
World Of Warcraft Levelling Cheat Guides Why this run on World of Warcraft gold? Blame it on the five million people worldwide who play World of Warcraft (that's more people than live in the state of Colorado). A World of Warcraft mount [read more..]
Once more, baby boomers are contravening the rules d seventy percent of those forty-five years old and older are planning to continue working in their retirement years. Financial stability is not the only reason, pure enjoyment of work or desire to t [read more..]
Wireless Lan And Laptop Computers A small business run from home or on rented space, while it can be extremely profitable, cannot be furnished in the same style as a large-scale company office. Using standard full-size desktop compute [read more..]
Qualifications what do employers look for When applying for jobs, it is important that you read through the job description thoroughly before submitting your application. A lot of what employers are actually looking for in their potential ass [read more..]
Buying PLR Articles: What You Need to Know Are you looking for an affordable way to purchase web content? If so, you may come across PLR articles available for sale online. PLR articles are increasing in popularity, but are they right choice [read more..]
Find Out Why You Feel The Withdrawal Symptoms When You Are Trying To Quit Smoking No problem, I could quit anytime I want to. That is the case for many smokers who believe they can quit anytime they want to as though they believe they had a magic switch to turn the nicotine off. Bu [read more..]
How Much Does A Franchise Cost How much does a franchise cost? Of course the cost of obtaining and starting a franchise depends on several variables. For instance, the type of industry, size and location are some of the differentia [read more..]
Hello From Vancouver- Part 1 – Arrival In Vancouver I left beautiful Victoria early yesterday morning at 8 am and took the Pacific Coachlines busferry combination back to the mainland. It was another gorgeous day and I spent the entire ferry ride on th [read more..]
What Fiber Optic Supplies Do You Need To Clean A Fiber Optic Connector First, lets understand why a fiber optic connector needs cleaning.You may never need to clean the RJ45 connector for your computers Ethernet network connection, then why do you need to clean a fiber o [read more..]
Lexar Bid is Inadequate On Friday, flash media maker Lexar Media (LEXR) received a higher revised takeover bid from Micron Technology (MU). The revised bid places the all-stock exchange offer at around 10 a share, up margina [read more..]
Are Weight Loss Supplements Useful It doesnt matter what you are doing – browsing the Internet, surfing cable, or flipping through your favorite magazine you will find plenty of advertisements that promote the magical qualities of wei [read more..]
Belladonna Belladonna is not an herb that you are going to want to stock your pantry with. While it has its benefits, this is an herb that can be very dangerous and sometimes even fatal. It has some medicinal pr [read more..]
Saving The World With Forensic Science Forensic Science is the application of science in forensic studies, the forensic part of forensic science implies that it is to be utilized in some form or another with a court of law and is relevant [read more..]
Making Seo Services Offer A Return On Your Investment DISCOVER YOUR INTERNET MARKETING BUG..In order to make a solid milestone on the internet marketing segment there are some certain factors people should rely on. Except of those you cannot drive the tr [read more..]
Cashing In On Blogging Blogging is very famous nowadays not just among businessmen but also to the students and other people. Aside from it is a funny thing to do, it gives something that no human being could ever explain.O [read more..]
And here is a troublesome one: Don’t turn on the heater or air conditioner instantly after you start the engine.
Natural Vision Improvement is considered by some to be an alternative treatment for some kinds of vision problems Day to day stress on our eyes can cause us to have some vision problems. Natural Vision Improvement is designed to undo the damage that is caused through our daily routines. Dr. William Bates suggests [read more..]
What Are The Basics Of Home Refinancing The decision to take out a second mortgage to refinance your home should never be a frightening resolution to any mortgage holder. Home refinancing is worth the decision if and only if you follow the [read more..]
Improve the Efficiency of your Business with Sales Training Programs Proper sales training is crucial for the success of any business! The efficiency of your sales depends on various interrelated factors such as the efficiency and the skills of your business members, t [read more..]
Poetry Discussion Soothes the Users Soul know that everyone loves poetry, if not in writing maybe in reading. It is very true that poetry adds spices to life. When you read beautiful poems and share it to other people, what kind of emotion [read more..]
Stop “Shoulding” on Yourself: Parenting without Resentment Parenting extroverted children sure can be exhausting for an introvert. Constant noise, questions, chatter. No room in my head to hear myself think. Actually, now that my kids are finally in bed, a [read more..]
Thank you for the good writeup. It actually was a entertainment account it.
Glance complex to far brought agreeable from you!
However, how could we be in contact?
History of the Paralegal Profession When you find the legal world appealing, you might as well get yourself acquainted with the history of the paralegal profession. It is not that ancient as it only started in the 1970s. However, court [read more..]
New Old Tips For Blind Dating A blind date is when two people who are perfectly strangers to each other or who may not know that much about each other are being set up on a date by either family or friends or may both be setting i [read more..]
Two Ways To Begin Repairing Your Credit Credit is a necessary tool for many people's day-to-day lives. Good credit allows for many advantages that we sometimes take for granted: credit cards, the ability to rent an apartment, qualifyin [read more..]
Eating Out, Mexican Style: With the fast pace and competitiveness of American society, dining out is a way of life for many people. Americans eat out an average of three to four meals a week. Unfortunately, in many cases, resta [read more..]
Wahm pet sitting business If you have experience working with animals, or are just an animal lover, then starting a work at home pet sitting business may be right for you. Pet sitters offer an important role to pet owners and [read more..]
Programmable Electronic Banners: Are They Effective Today there is a company in the business of creating programmable electronic banners. The name of this company is Pro-Lite Inc., and they are located in Costa Mesa, California. They introduced the 3 [read more..]
situs bom88 situs link bokep yang banyak tersedia berbagai macam jenis video
bokep yang ada
ria money transfer
Hey there would you mind stating which blog platform you’re working with?
I’m planning to start my own blog soon but I’m having a difficult time making a decision between BlogEngine/Wordpress/B2evolution and Drupal.
The reason I ask is because your design seems different then most blogs and I’m looking for something completely unique.
P.S My apologies for getting off-topic but I had to ask!
Sony BRC-H700 The Sony BRC-H700 high definition video camera isdesigned for a variety of remote acquisition applications, especially in television productionfor recording programs and for use as a weatheror even tr [read more..]
How To Learn Spanish Its A Cinch How to learn Spanish? As I am sure you know learning a foreign language is not an easy task unless you are one of those people with an ear for language, something I never really understood. There ar [read more..]
Launch your site, before it is finished Launch your site, before it is finished. When you launch a site, you face three major problems: The search engines don't know you, the users don't know you and you might not have any meaning [read more..]
Make Big Money With Affiliate Program Have you ever joined an affiliate program with a great productservice but still can't make big money (if any)? Then where in the world all these affiliates with a big pay check came from? Can you [read more..]
How to Get Free Garbage Bags The scenario:A newlywed couple moves into their new home. After a couple of months, they realize that they have many more garbage bags than they need. However, they have not bought any garbage bags si [read more..]
Rent Video Games- Save Yourself Time and Money The ability to rent video games from home without leaving the house has always been a true dream of mine. Not only does renting video games online keep you busy, but it can be very satisfying knowing [read more..]
WOW just what I was searching for. Came here by searching for https://789p.pw/
WOW just what I was looking for. Came here by searching
for sex trẻ em
I’ve learn some excellent stuff here. Definitely value bookmarking for revisiting.
I surprise how a lot attempt you put to make the sort of fantastic informative web site.
Sponsors might be of two sorts: company sponsors and community organizations.
Title: Bad Credit Private Student Loans For Help Source: http:financeequityloans.comCategory: student loansArticle body: Worried that you might miss school because of your bad credit rating, and can't manage a private student loan? Come on, the [read more..]
Chocolate Of The Month Club – The Amazing Monthly Chocolate Treat To Indulge That Chocolate Passion Neither I nor anybody else really has to sell you on the beauty of the chocolate of the month club. I mean, hell, chocolate is one of the top five most popular foods on the planet Get a membership for [read more..]
Forums A Consumer Centric Approach If youve participated in a forum lately you may have stumbled across blatant advertising from individuals who obviously have no interest in the forum, its members or the subjects being discussed.Many [read more..]
The Medical Assistant Salary Medical Assisting is one of the fastest growing career opportunities offered in the real world these days A lot of medical groups and organizations are looking for medical assistants to help them with their administrative and clinical duties and responsibilities. With this demand, thousands of medical as [read more..]
haartransplantation ohne rasur hamburg
you are really a good webmaster. The site loading speed is amazing.
It sort of feels that you are doing any unique trick.
Moreover, The contents are masterpiece. you have done a fantastic process on this subject!
ordu nun meşhur yerleri
I delight in, lead to I discovered just what I used to
be taking a look for. You have ended my 4 day long hunt!
God Bless you man. Have a nice day. Bye
blogger link
Wonderful beat ! I wish to apprentice while you
amend your site, how can i subscribe for a blog website?
The account helped me a acceptable deal. I
had been a little bit acquainted of this your broadcast provided bright clear idea
The good news is that over the previous couple of years, graduates with MBAs have found opportunities in a higher number of fields than in the past.
international money transfer turkey usa
Does your blog have a contact page? I’m having a tough time locating it
but, I’d like to shoot you an email. I’ve got some creative
ideas for your blog you might be interested in hearing. Either way, great site and I look forward
to seeing it grow over time.
The final came from slotting the crankshaft from the older 283 engine into the then-current 327 block, yielding 302.Four cid — just below the restrict.
Michael Roy Williams, these days Technical Director, Aerospace Group, Rolls-Royce plc.
I constantly spent my half an hour to read this weblog’s content every day along with a mug of
coffee. https://Menbehealth.Wordpress.com/
işçi avukatı istanbul
Sweet blog! I found it while searching on Yahoo News.
Do you have any tips on how to get listed in Yahoo News?
I’ve been trying for a while but I never seem to get there!
Cheers
Learn about your med’s quick influences.
get ozempic online for weight loss
Get the lowdown on drugs. Read now.
I like it when people get together and share ideas. Great blog,
keep it up!
I was suggested this website by means of my cousin. I am not positive
whether or not this put up is written by him as nobody else recognise
such certain approximately my difficulty. You are incredible!
Thank you!
türkiye’den yurtdışına para gönderme
After I initially commented I appear to have clicked the -Notify me when new
comments are added- checkbox and now every time a comment is added I get 4
emails with the same comment. Perhaps there is a means you are able
to remove me from that service? Kudos!
türkiyenin tarihi eserleri nelerdir
I am sure this piece of writing has touched all the internet people, its really really good paragraph on building up new web site.
deprem farkındalığı poster
Great beat ! I wish to apprentice while you amend your
site, how can i subscribe for a blog web site? The account helped me a
acceptable deal. I had been tiny bit acquainted of this your broadcast provided bright
clear concept
This article is really a good one it assists new internet visitors, who are wishing in favor of blogging.
The surviving partner should use this Program inside ten (10) years of the date eligibility is established.
This stone is alleged to bring good luck.
Remember, they’re going to be applying and mixing shadow and possibly different merchandise on some of the delicate areas of your physique.
Grient, Bart; Blitz, David; van Vliet, Pim (July 1, 2011).
Hard Money for Real Estate Investing Real estate investing is one of the most common uses of hard money funds. Real estate investing is a cash intensive financial activity. In order to take advantage of ongoing projects, investors often [read more..]
Home Remedies For Premenstrual Syndrome (PMS) Diet plays a very important role either in aggravating or subsiding PMS problems. Eat complex carbohydrates such as whole grain breads, pasta and cereals, fiber and protein. Cut down on your sugar and [read more..]
Where To Get Online Car Insurance There are a vast amount of online insurers that only deal with car insurance online and it is with one of these that you can get the cheapest deal when it comes to paying out your premium.By making a [read more..]
Look Into Anavar-Oxandrolone Information Anavar-Oxandrolone is a mild anabolic with low androgenic action. It has reduced androgenic activity because of its dihydrotestosterone (DHT) derivative property. Initially, Anavar-Oxandrolone was int [read more..]
Learn From The Rich: Having An Offshore Bank Account Suggest to the average American that he or she might benefit by owning a foreign bank account and you'll more than likely get a questioning look and a response such as, "Why on Earth would I [read more..]
The Benefits of Writing Articles You have a business; you are new and want to build a client list. However, the public doesn't know much about you.One of the best ways to build the relations, credibility and to help get people t [read more..]
Help For Children Who Are Depressed Are you the parent of a child who is often depressed? Are you a child who often feels down in the dumps and depressed? This article offers advice for both parents, other family members and children ab [read more..]
10 Tips For Using Adobe Photoshop Like a brush is to a painter an essential skill in the field of graphic design is Photoshop. The software offers increased productivity as well as flexibility. The features include aspects like file b [read more..]
Can’t Get A Debt Consolidation Loan Despite the popularity of debt consolidation loans, they arent always the best option for people who are in debt. Also, if youre in debt, it isnt always very easy to get a debt consolidation loan. Not [read more..]
MOTIVATIONAL KEYNOTE SPEAKER THE SEQUEL bUnderstanding your audience.bpTen years ago, in my past life as a business consultant, I read somewhere that the average person is hit with three thousand marketing messages a week. Can you imagine w [read more..]
Lawyers Are The Most Laughed Off Professionals I used to be a lawyer, but now I am a reformed character. – Woodrow Wilson (1856 – 1924)Pun apart, dictionary says a lawyer is a professional person authorized to practice law; conduct lawsuits or giv [read more..]
Getting Mixed With The Leading TV Shows This sort of on-screen celebrity unraveling was to set the standard for the second and third Celebrity Big Brother series and boy they havent disappointed.Series two saw former Take That singer and al [read more..]
This type of funding for flipping homes permits traders to shut a deal in a brief time frame and earn a big revenue.
India wins over England in fifth one-day international India has won the fifth one-day international cricket match against England in Leeds. India beats England by 38 runs in a rainy one-day cricket international to uphold the chance of winning the seven- [read more..]
Everyone wants to be comfortable yet look really good Adidas has been making track jackets for as long as anyone can remember, but thankfully the styles have changed. In the 80s, rap artists made these jackets very popular by wearing them with the matchi [read more..]
Valentine’s Day – Why Rose Is The Preferred Flower The world is full of flowers. Visit any place dedicated to flowers and you will be amazed at the types of flowers, and facts about them. Flowers come in all shapes, and colors. Some of them can intoxi [read more..]
Search Engine Optimization Starts With The Competition Analyzing your competition is a good place to start when optimizing your web site for search engine placement. SEO or search engine optimization is about topping your competition. By looking first a [read more..]
Auto Vent Shields: Keep The Bugs Away In days gone by, the thought of placing a bug shield on your car simply meant finding a tacky looking navy blue mesh net and draping it across the front of your car. Besides looking awful, these earli [read more..]
Writing Business Articles Business articles are a great way to let readers searching the Internet know everything about your new or existing company, and what you can offer them in your unique products and services. You may be [read more..]
7 Habits Of Highly Effective Investors There are 7 habits that highly effective investors engage in regularly that separate themselves from the thundering sheep herd. These 7 habits, in fact, often lead to highly effective investors acting [read more..]
Visco Memory Foam Mattress A visco memory foam mattress gets it's name from the visco-elastic material developed for NASA in the early 1970's in conjunction with the space program.The astronauts in the space program w [read more..]
Inside The List: The Secret To Real Online Profits So, What Is 'Inside The List'?You have no doubt heard the saying "The money is in the list", well this product claims to teach you how to set up subscriber lists and how to market [read more..]
TRANSFORMATIONAL COUNSELING Transformational Counseling is a process of assisting others to transform their lives. Transformational Counseling is a process of assisting others in their reinventing themselves, of creating a life [read more..]
How to cope with stress and increase your natural energy About a quarter of all people who visit their doctor or medical health practitioner complain about feeling tired, run down or exhausted. Often an underlying health issue is the cause and their body is [read more..]
A Guide to RSS Aggregators One of the most popular features of Internet portals, websites, pages and even emails is a frame that features an organized list of news headlines and periodic updates from other web sources. Really [read more..]
Why Many Individuals Take a Singing Lesson There are millions of children or adults who take a lesson in a subject that they wish to excel at. These lessons can deal with sports, academics, dance, instruments, and singing. While all of these [read more..]
When Things Go Wrong: How To Resolve eBay Disputes eBay has quite an intricate and long-winded dispute resolution procedure. In this email, I'll try to break each step down for you, so you can see what's involved and how long it takes.As an [read more..]
In today’s innovation driven business sector, robotized trading systems require no presentation.
How to Sell Your Products on eBay Founded in September 1995, eBay is The World's Online Marketplace for the sale of goods and services by a diverse community of individuals and small businesses. Today, the eBay community includes [read more..]
7 Search Engine Optimization Strategies That Work the Internet becomes even more pervasive, the importance of search engine optimization continues to grow.You can make the most of your Internet marketing efforts by following the same steps that top r [read more..]
What is Career Education It should be utilized fully and must be treasured for the rest of your life. So if you want to move on and advance in your own career, then go. No one is pulling you back. But, if you think that yo [read more..]
Search Engine Friendly Frames are becoming a way of the past what with the use of DIV layers and the slow onset of incredibly flexible AJAX coding. The long and the short of it is that if you have Frames on your website the [read more..]
Vertical Blinds Can Add Life To Every Room Vertical blinds not only add value and beauty to your room but are also an inexpensive way to decorate your rooms. Vertical blinds come in various materials and provide a good alternative to curtains [read more..]
Forex Market Vs You have probably traded stocks before, but have you ever traded currencies? Currency trading goes back thousands of years and was the first market used by nations, traders and merchants to facilitat [read more..]
Hematology Sprague Dawley Rat Hematology is the branch of internal medicine focusing mainly on the blood and diseases affecting it. Findings in this particular branch of medicine depend largely on extensive laboratory work, includ [read more..]
Masonic Apron The concept for Masonic apron has long been there. It is not a modern invention; in fact it is the most ancient of all garments as Masonry has been alive for centuries. The Masonic apron is in the [read more..]
The Golden Age of Comic Books By and large, the accepted time frame for the golden age of comic books ran from a period from the 1930's through the mid-1950's. It was a prosperous time for the American comic book realm. [read more..]
constantly i used to read smaller articles which as well clear their motive, and that is also
happening with this article which I am reading here.
Staying Motivated to Exercise Exercise is always a do-it-yourself venture. No other person and no machine can do it for you. Hence, it is important to have those motivating factors so that a person who is into exercise in order to [read more..]
The Truth about Cash Gifting and Taxation Make no mistake: cash gifting is 100 legal in the United States and Canada. There has never been a law passed that prohibits us as individuals from sharing our assets, belongings or cash. It is a mi [read more..]
ini adalah situs bokep paling bagus
Alaska Fishing Lodge: The Natures Abode Recreation is an important aspect in the life of human beings. Anglers represent the major group of leisure seekers, and have a determined advantage over the other groups who make use of natures wonde [read more..]
Discover the secrets to achieving optimal wellness with our expert guidance. From mindful movement and natural skincare to gut health supplements and digital detox retreats, our comprehensive resource covers it all. Learn how to prioritize your mental health, boost your energy, and nourish your body with our actionable tips and expert advice. Whether you’re looking to improve your sleep hygiene, optimize your fitness routine, or simply find a sense of calm, we’ve got you covered. Explore our curated content and start your journey towards a balanced, holistic lifestyle today!
[url=https://wellness-warrior-guide.blogspot.com/2024/07/physical-wellness-guide-start-strong-no.html]Mindfulness Exercises[/url]
Timing and Appropriateness- The Basics of Corporate Awards and Gifts Corporate award and gifts are great for mostly everything, including the marketing of your company. It is also good for maintaining working relationships among people in your businesses while keeping [read more..]
Make Money Online Scripts And Their Potential Making money online is not so easy if you just run aimlessly and grab the things that you never wanted to piling up the garbage you never wanted to. Be smart and even better act smart. Grab some bette [read more..]
Keeping The Operating Patient Safe By Accounting For All Items Used During Surgery Most surgical patients don't know that before their operation begins, a laborious process called an instrument count is down. This procedure includes counting each piece of sterile equipment that [read more..]
How To Choose Quality Web Directory To Submit Your Website To If you're interested in buying links from web directories so that your sites will rank with the search engines, there are a number of factors you will want to take into consideration. First, ther [read more..]
Tips for Planning a Trip to California Wine Country Are you a wine enthusiast or do you at least enjoy drinking wine? If you enjoy wine, you may be interested in taking a trip to wine country. After all, it is not uncommon for wine enthusiasts to wan [read more..]
Is it Safe to Sell Coins to a Dealer?Coin collecting can be a lot of fun. This hobby which dates back to 2500 BC is much larger now since people are now able to collect currencies from other countries [read more..]
What Are Some Natural Asthma Remedies Most asthma sufferers are familiar with the inhalers and oral remedies prescribed by their doctors for the treatment of wheezing, coughing and shortness of breath that accompany an asthmatic episode. [read more..]
Hi, Neat post. There’s an issue along with your
web site in web explorer, may check this? IE still is the
marketplace chief and a large element of folks will omit your fantastic writing because of this
problem.
Discover the secrets to achieving optimal wellness with our expert guidance. From mindful movement and natural skincare to gut health supplements and digital detox retreats, our comprehensive resource covers it all. Learn how to prioritize your mental health, boost your energy, and nourish your body with our actionable tips and expert advice. Whether you’re looking to improve your sleep hygiene, optimize your fitness routine, or simply find a sense of calm, we’ve got you covered. Explore our curated content and start your journey towards a balanced, holistic lifestyle today!
[url=https://wellness-warrior-guide.blogspot.com/2024/09/mindfulness-magic-easy-tricks-to-calm.html]Nutrition Advice[/url]
Hiking the Continental Divide in Winter Park, Colorado 600 miles of trails stretch throughout Winter Park and the Fraser Valley. Whether you choose to follow a babbling brook, stroll through a wildflower meadow, or climb up the side of a mountain, Winter [read more..]
How Much Car Insurance Should You Buy How much insurance should you buy? Any insurance agent worthy of their salt will tell you that you should buy as much as you can afford. While this is a good rule of thumb, it's about as useful a [read more..]
CyberScrub Privacy Suite Review Did you realize every picture, video clip, chat room conversation and website address you visited is written to your hard drive. Simply opening an email can put you in a compromising situation. Your d [read more..]
naging a law office can be a tough job, especially if you are only starting out as a new lawyer or a new partner in a firm. You have to play three roles all at once the entrepreneur, the manager, and [read more..]
VOIP Broad Band Phones Voice on Internet Protocol (VOIP) Phones are referred to as just Broad band Phones. The main function of a Broad Band phone using VOIP is to convert voice data (analog) into digital data for transmiss [read more..]
honeymoon with a difference A honeymoon in will reveal to you a rich and historic country! This is made up of diverse art, architecture and cuisine waiting to be discovered. is a relatively small and modest nation by European [read more..]
Go Rustic – Add Rawhide Lamp Shades To Your Lamps Today Go rustic with genuine rawhide lamp shades, the easiest way to develop a country or rustic style. Even if your current lamps and furniture are more traditional, create a warm western or southwest atmo [read more..]
Healthcare Savings Account With the passage of the Medicare bill in December 2003, questions about the healthcare savings account (HSA) have been asked Here is a list of some of the most commonly asked questions about healthcare savings account and their answers:1. Who can qualify for a healthcare savings account?Age restrictions in a healthcare savi [read more..]
ria money transfer logo
Do you mind if I quote a few of your articles as long as I provide credit and sources back to your website?
My blog site is in the very same area of interest as yours and my visitors would genuinely benefit from some of the information you present here.
Please let me know if this ok with you. Cheers!
Journal Rock Climbs Rock climbing is a great way to challenge yourself and get a heck of a view. Alas, your experiences can fade with time. The best way to prevent this is to keep a journal for rock climbs.Journal Rock [read more..]
Have Hair Care Having a hair cut can change your look completely. It can be better or worse. Sometimes you will feel better when having a new cut or color. Here is the story of hair.The mysteries of maintaining beau [read more..]
Title: Is Student Loan Consolidation For You Source: http:financeequityloans.comCategory: student loansArticle body: You finally made it through college! That's great, but did you end up with a mountain of debt in the form of student loans? [read more..]
More than twenty percent of jobs are filled by emigrants, and many new ones arrive each year drawn by higher wages and lower taxes, including an enhanced quality of life and the chance to experience life in a different culture for guest workers are governed by strict regulations and working in does have its downside.Most expatriate workers tend to be from , , , US, and the . Theres also a strapping Italian group in the ho [read more..]
Beginning Pointe- What to Expect Although every teacher is different, the goals of the introductory pointe class are similar no matter where you dance. These goals include strengthening the feet and ankles, breaking in the pointe sh [read more..]
The Purpose of the Charity Commission The Charity Commission is a government body in and , which is the law-appointed registrar for charities. It is also responsible for regulating the countries registered charitable organizations. The C [read more..]
Some Great Ideas for Spring Patio Furniture As days grow longer and warmer, more and more time is spent out on the patio. A comfortable patio environment will make sitting outdoors more enjoyable for all seasons. Here are some ways to set up a [read more..]
How to pick the Dream Tattoo Design That You Want Today A recent survey tells us that 24 of Americans between the ages of 18-50 are tattooed. This is almost 1 in 4. The most popular reason people get tattooed is To broadcast what they are all about.Keepi [read more..]
The Basic Guide on How to Write Articles If you have just discovered the many routes that you can take with regards to online marketing, you may be faced with many questions. One of them and a very important one is how to write articles.The [read more..]
Airplane Seat Maps Many people that fly for pleasure or for business purposes have to seat in an airplane for 2-3 hours or sometimes even more, depending on the trip that they make, and during the flight seating in an u [read more..]
Affiliate Tracking Software: How It Can Help You If you own an online retail store or run an online business that sells a specific service, you may be looking for ways to increase your sales. There are a number of different methods that you can use [read more..]
Primary keyword– Definition of quality Secondary keyword Definition of quality , meaning of qualityPage title– Definition of qualitySub titleQuality Definition of quality:In a layman language quality is good, excellent and long-lasting. B [read more..]
Choosing A Non-Traditional Venue For Your Wedding Ceremony There are many weddings that are held outside of traditional religious facilities, including out-of-doors, in large houses, courtrooms, and location weddings. These areas can offer a great, unique occ [read more..]
Разнообразие предложений и уверенность в надёжности делают шопинг комфортным и безопасным.
Клиенты выбирают мега онион благодаря отличному качеству и приемлемым ценам.
Can Feral Cats Be Tamed Feral cats are different from stray cats. Stray cats are usually the product of a persons irresponsibility. Irresponsibility could be defined in two ways when it comes to strays: dumping a cat to fen [read more..]
Searching For The Best Equity Loans It is a great idea to invest in homes these days, as real estate prices rise higher and higher every moment. As long as you make a sensible purchase, you will only gain with every dollar or euro or ye [read more..]
Kitchen Remodeling Books: Worth the Money Each year, thousands, if not millions, of Americans make the decision to remodel their kitchens. Kitchen remodeling can include something as simple as replacing your kitchen sink, but it can also incl [read more..]
Tips To Survive The Holiday Travel Season The holiday season is nearly upon us, and with more and more people gearing up this year to travel during the Thanksgiving and Christmas holiday season, the thought of doing so yourself can be a daunt [read more..]
Ezines As An Affiliate Revenue Generator Many business owners utilize ezines as a marketing tool that can assist customers in understanding more about the products they provide and how best to use those products. This is free information for [read more..]
Failed Hard Drive Data Recovery Tips One thing that manufacturers of hard drives will not tell you is that hard drives are subject to fail, regardless of the amount of time they are used. Some takes more than 10 years before the hard dr [read more..]
The Choices You Make When Getting A Credit Card It is inevitable that one day, you too will have your own credit card. When that time comes, it is essential that you start off in the right foot. This means you have to make the right choices when ch [read more..]
Steroid profiles and Guide for Users of Steroids Steroids are basically hormone derivatives which were first developed to help treat various medical conditions. Initially, they were used to stimulate bone and muscle growth, appetite disorders, chron [read more..]
r some, it started on a family vacation to some town in the backcountry when to keep themselves occupied for the whole eight-hour drive, their parents or family members must have handed them a copy of [read more..]
You Just Never Know: From Chicken Soup For The American Idol Soul Excerpt From Clay AikenAmerican Idol Runner-Up, Season 2It was December 2003, and Christmas was just a few weeks away. I was in Atlanta as part of a radio tour around the country when I received a ver [read more..]
Winning Lottery Systems Now doesn't everyone want to win the lottery? Last year we had so many requests for this one, that we were forced to do it this year. We had to comb through hundreds of scams and BS products to [read more..]
Auction Tips For Sellers And Bidders At first glance, selling and buying items online would appear to be as easy as sending an email or downloading a song after a few clicks of the mouse. But with the rate at which several online auction [read more..]
Roses 101: When To Send Them Why Roses are perfect for any occasion because they are classic and they smell just as terrific as they look. Whether you opt for real or silk roses, the lucky recipient is sure to be happy. Below are som [read more..]
Climbing Is An Invigorating Sport Climbing is a competitive sport that requires people to be in good physical and mental condition. The rugged terrains that are often encountered while out rock climbing in the wild, have the tendency [read more..]
Don’t Turn Debt Consolidation into Your Next Credit Issues Debt consolidation is a process to combine all your high interest rate into single and lower interest rate monthly payment. It has been used by many debtors to plan for a debt relief. Commonly, a debt [read more..]
Colored Diamonds Fancy colored diamonds are all the rage these days. Gemologists have developed new ways to create versions that are affordable for the average person – by treating less desirable diamonds. These less [read more..]
Features Of The Xbox 360 Do you know what's special about the Xbox 360? Here are some of the features you can expect from Xbox 360:Ring of Light and Xbox Guide Button. The ring of light is the power button and it is divi [read more..]
Gastric Bypass – The Advantages Of Laparoscopic Surgery Gastric bypass surgery is the most often carried out operation for weight loss in the USA with more or less 140,000 operations being done in 2005 Dating back more than 50 years, a lot of surgeons have [read more..]
Jobs in television The television is perhaps the most powerful type of communication medium since it commands both visual and audio It is no wonder why several defiant personalities strive for jobs in television as well as camera "exposures" despite the stiff competition. Landing a television job require more than luck. [read more..]
Destination Wedding Advice We are more mobile than ever, so lets take advantage of it by choosing to get married in your dream location. If you love the ocean, but you live in a land locked part of the country, a destination we [read more..]
Business Card Design That Works There are a lot of business cards being circulated by countless businesses nowadays, but the truth is most people only keep a few. The main reason is that the business card does nothing to make the pe [read more..]
What If You No Longer Existed This is not a new age riddle or philosophical question; it is a real problem that millions of people face more frequently that most people realize. It might happen because of a lightning strike or a p [read more..]
Becoming Wealthy through the Home-Based Business Opportunity Thanks to the Internet, more people than ever before are discovering that they can launch their own home-based business. Essentially, all you need is a computer, an Internet connection, and the right [read more..]
Home Water Treatment You will never find water that is 100 percent pure Always, it contains contaminants, whether from natural causes or from man-made sources. While many of these contaminants are harmless, there are some impurities that can adversely affect your health. [read more..]
Ouray — Summer Vacation Adventure In The Colorado Rockies Let me guess. You're getting that restless feeling. It's been a long, hot summer already, and OOPs! Here it is mid July and summer will be over before we can invite the in-laws over for t [read more..]
Global Marketing Global marketing is nothing but marketing done on national and international level and which involves understanding the similarities, dissimilarities and taking advantage of the opportunities to attai [read more..]
you are in point of fact a just right webmaster.
The website loading velocity is amazing. It sort of feels that you are doing any distinctive trick.
Furthermore, The contents are masterpiece.
you have performed a great activity in this matter!
Tips to understanding the ABCs of online colleges The world of education has been revolutionized. E-learning is a world where by using simple computing skills and having an Internet connection one can earn a bachelors, masters, or doctorate degree. N [read more..]
Asia Safety Travel Tips Asia occupies a quarter of the earth's land mass, it spans a lot of time zones. Having a single travel guide for all of Asia is virtually impossible. Asia like any other continent, here are basic [read more..]
Modern Radio Hobbyists An amateur radio is called a Ham radio, and the operator is called as an amateur radio operator. They pursue the ham radio operation as a hobby, and it is a vastly popular hobby at that.The origin of [read more..]
After I originally left a comment I seem to have clicked the -Notify
me when new comments are added- checkbox and from now on whenever a
comment is added I recieve 4 emails with the exact same comment.
Perhaps there is a means you can remove me from that service?
Many thanks!
Uranium Facts For The Natural Resource Investor Investing in uranium is looking toward the future. With fossil fuels fizzling out, the world needs reliable sources of energy. The price of uranium has moved surpisingly fast over the last year with t [read more..]
Aluminum Siding When you hear the term aluminum siding, what idea comes first to your mind Yes, although many have considered it as an old fashioned alternative, aluminum siding is still used by a number of households anywhere in America and the world these days.The aluminum siding is deeme [read more..]
General Information Regarding Self Certification Mortgages And Remortgages In The UK Self certification mortgages and self certification remortgages are useful financing options for those individuals looking to buy a new home or obtain a new mortgage in the UK. Those individuals who w [read more..]
Keeping Your Valuables While Traveling Traveling, be it just across state or to another country is always a great experience. To help people enjoy it rather than having an untoward incident such as losing one's passport or other items [read more..]
Windows Cleaner: Protect Your Online And Offline Privacy It is prudent to install a window cleaner on your computer to protect your privacy against large-scale personal identity theft threats prevalent these days.If you do not want anyone to invade your pri [read more..]
Gain Control Of Your Business Finances Business finances and expenses can easily spin out of control and cause you, the business owner, and a lot of undue stress. So if this is you, how do you gain back financial control? The key to gettin [read more..]
Get Your Performance Appraisal Discussions Off to a Good Start In a previous article I shared a couple of tips that will reduce the feelings of discomfort that often come when a performance appraisal is discussed gather your materials in advance, make a list of [read more..]
Which Airline Is Really The Best Pick up any newspaper or watch any news channel and many times you will find something about the airline industry. Popular topics range in how gas prices affect airline prices, the latest merger or ba [read more..]
Be Smart With A Credit Card And Use It Wisely Owning a credit card is something that can be a very positive thing… as long as it is used responsibly. There are many ways for people to use credit cards to their advantage, but there are also ways [read more..]
How To Keep Customers Loyal Business analysts know that it costs a company much more money to get a new customer than to keep doing business with their existing ones. Thus, to be as profitable as possible companies are urged to [read more..]
The Sopranos (DVD) Review Along with Sex And The City, the HBO original series The Sopranos took the world by storm in the late-1990s with its cutting edge drama and acerbic wit. A cross between The Godfather and the tradition [read more..]
ISO Specifications And Its Importance This article is written in the context of Digital SLR (single lens reflex), which are combing the market like crazy nowadays.ISO stands for International Standards Organization, which refers to how to [read more..]
Movie Downloads: A Case For Playing It Safe Just four years ago, downloading movies was something people would only fantasize about. Fast forward a few years, and movie downloads are becoming more, and more popular. People are choosing to downl [read more..]
History Of The Pit Bull No other breed of dog has experienced as many discriminations and misconceptions as has the Pit Bull. While some people would tell you that Pit Bulls are a gentle and harmless pet, other people consi [read more..]
Age New Spirituality – Inspirational Stories ( Part 48 ) Just as every action that emanates from us comes back to us as reaction,even so our actions may act on other people and theirs on us. Perhaps all of you have observed it as a fact that when persons do [read more..]
Cultivating A Millionaire Mindset Success rarely happens by accident. Admittedly, there are some who have literally stumbled upon success but the vast majority who reach those heights fought long and hard to get there. In fact, the ma [read more..]
rd Count: 426 Key Word Density: 5 426 x 100 1.17Bill Bailey Comedian Wont You Come Home?Ever heard the song Wont You Come Home Bill Bailey?? Who is Bill Bailey? Perhaps another fictional character? [read more..]
Using Points To Cut Your Interest Rate The general mantra in the real estate world is you want to avoid paying points when obtaining a mortgage. As with most assumptions, this is not always true. Using Points To Cut Your Interest RateWhen [read more..]
Hi there, I discovered your blog by the use of Google at the
same time as searching for a similar subject, your web site got
here up, it appears to be like good. I have bookmarked it in my google bookmarks.
Hi there, simply become alert to your weblog through Google,
and found that it’s really informative. I am gonna be careful for brussels.
I’ll appreciate should you proceed this in future.
Lots of people will likely be benefited from your writing.
Cheers!
Great info. Lucky me I ran across your website by accident
(stumbleupon). I’ve bookmarked it for later!
istanbul icra avukatları
I’m gone to tell my little brother, that he should also go to see this website on regular
basis to take updated from newest news update.
Magnificent web site. A lot of useful information here. I’m sending it to several pals ans also
sharing in delicious. And of course, thank you for your effort!
Ohio Medicaid Firm preserved valuable family resources.
Hi there colleagues, nice article and nice urging commented at this place,
I am in fact enjoying by these.
antalya psikolog
Having read this I thought it was very informative.
I appreciate you taking the time and energy
to put this informative article together. I once again find myself
personally spending a lot of time both reading and
leaving comments. But so what, it was still worthwhile!
I every time used to read piece of writing in news papers but now as
I am a user of internet therefore from now I am using net for
articles, thanks to web.
antalya psikolog fiyatları
Keep on working, great job!